Showing posts with label Baking. Show all posts

Make Your Own Gingerbread Mickey Cookies

Thursday, December 16, 2010

 What is better then a gingerbread man? A gingerbread Mickey of course!!
 For $7.95 you can buy this Gingerbread Cookie Mix that comes with a gingerbread Mickey cookie cutter. You can find them throughout the Disneyland Resort.
This is the easiest mix to make too, even if you are not a baker. 
 All you need in addition to the mix is one stick of butter and one egg.  Mix everything together until it forms into a ball and then lay out on a floured cutting board.  Roll the dough out to 1/4" thickness, and then use the cutter to make gingerbread Mickey cookies. 
 Little hands make great helpers for making these cookies. 
 You can also buy a Mickey head cookie cutter at the Disneyland Resort for $5.95.
 Bake at 375° for 6-9 minutes.
And then you are done, unless you want to decorate them. 
 I can honestly say these cookies are delicious, and I'm sure Santa would love a few of these on Christmas Eve. 
These cutters would also be great for sugar cookies, so now you too can have Mickey Christmas cookies at home during the holidays. 

Barbeque Cupcakes

Tuesday, June 29, 2010


The other day I decided to look at my June/July copy of Disney Family Fun magazine, and I came across these fun brownie cupcakes that look like a barbeque.
With candies, they were able to create hot dogs, pork chops, and kebabs. I looked at them thinking how cute the hot dog brownie cupcakes would be for 4th of July! We always have a barbeque pool party on the 4th, so I wanted to test these out before the big day. What I found, is that this is a really simple idea for a cute treat for the whole family.

Photo from Disney Family Fun

Here is a link to the online version of this page I found in the magazine. The recipe is included.

Orange sugar sprinkles for embers.

Hot Tamale "hot dogs".


Don't you just love these?

Toy Story Green Alien Cupcakes

Thursday, June 17, 2010

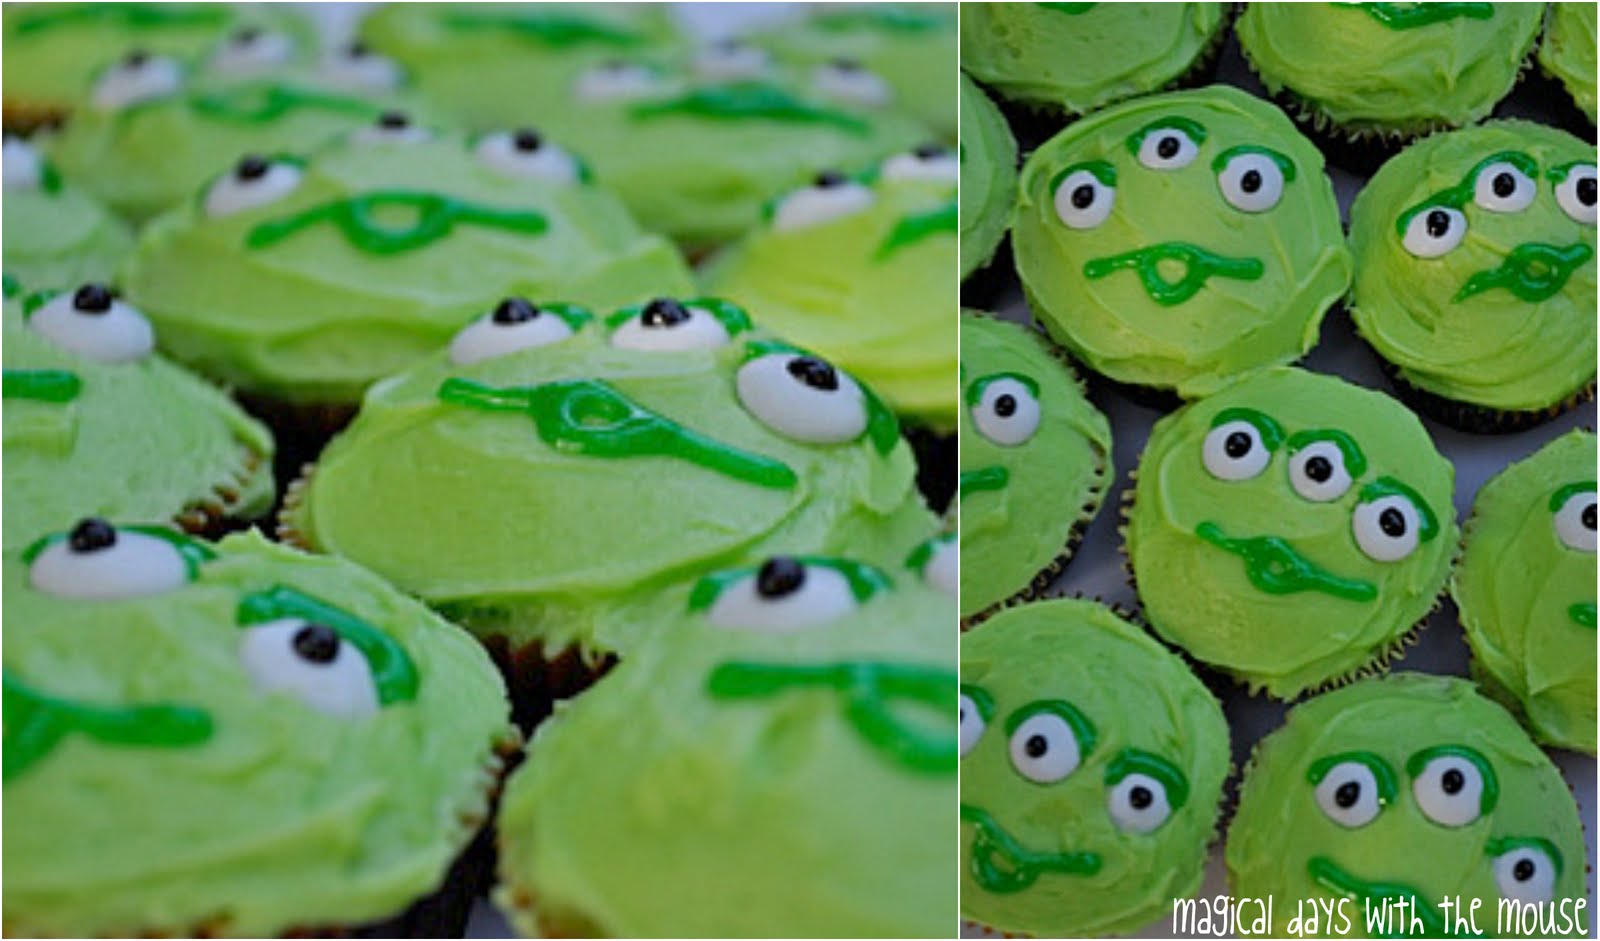
Last week I was out running errands, and I made a stop at Michael's craft store. I always like to see what kind of cupcake wrappers they have, even if I don't need them. I'm glad I did because not only did I find some for every day use, but I also found some Toy Story 3 cupcake wrappers with an alien on the bottom. OooOOOo. I'm going to be honest, it was the alien that sold it for me, and it inspired these cupcakes that I will show you how to make today.
The wrappers come in a pack of 75 for $1.99! Each wrapper has the Toy Story green alien on the bottom (saying OoOOoo), with Woody, Buzz Lightyear, Rex, and Ham around the sides.

So now that you have the wrappers (or are about the get them), lets make Green Alien cupcakes!

Just like with the Woody Sheriff badge cookies, we are going to make these from scratch. Here is what you will need:

• 1 c. unsalted butter
• 2 c. sugar
• 4 eggs
• 1 1/2 c. self rising flour
• 1 1/4 all purpose flour
• 1 c. milk
• 1 tsp vanilla
• green or neon green (or both) food coloring

Preheat oven to 350°.
In a mixing bowl, mix butter until smooth. Next add sugar, eggs, milk, and vanilla. Then add your flour 1/2 c. at a time. Once everything is blended, add your food coloring. I used both green and neon green food coloring to give the cupcake the perfect alien shade of green. If you only have one or the other, that will work too.
Now pour your batter into the cupcake papers. If you have an ice cream scooper, this not only helps with making sure each cupcake has the same amount of batter, but also helps with keeping the mess down.
Bake time is 20-25 mins depending on your oven. Put a tooth pick in a cupcake after 20 mins, and if it comes out clean it's done baking. If not keep checking every couple minutes.
Once they are done, wait 10 mins to cool. Then remove from pan, and place on wire rack to cool completely for frosting.

What you will need for frosting and decorating:

• 1 c. unsalted butter
• 8 c. of confectioners sugar (or more depending on thickness)
• 1/2 c. milk
• 2 tsp vanilla
• green or neon green food coloring (whatever you used for the cupake, use that again)
• white M&Ms
• black and green decorating gel

Again blend your butter until smooth, add milk, vanilla, and confectioners sugar 1/2 c. at a time. You will know that your frosting is done if you take a spoon, lift frosting out, and it stays in place on spoon. If it starts dripping you need more confectioners sugar. Add food coloring last. Make sure it's completely blended, so you don't have small chunks where the dye missed.

Now is the fun part. Take your completely cooled cupcake, and drop a heap of frosting in the middle. With a smooth knife or spatula, spread the frosting around to make a smooth surface.
Now take your white M&Ms, and place them across with the middle one being slightly higher.
If you have a hard time finding white M&Ms, Party City has them in the wedding section of the store.
Next take your green decorating gel (I used Wiltons Sparkle Gel also found at Party City), and outline the top of the M&M to create an eye lid for the green alien.
Take your black decorating gel, and make little dots in the middle of the M&M to complete the eye.
And last draw a line across for the mouth, and then draw the "O" into the line.
You should now have a Green Alien.
As you can see these are kid tested and approved, but you don't have to be a kid to enjoy them!

And if you don't feel like making the aliens, but you still want to make Toy Story cupcakes, I found these cupcake toppers at Party City.
And they also carry the cupcake wrapper for $1.99, so you could make it a one-stop shopping trip, and avoid Michael's craft store all together.

Toy Story Green Alien Cupcakes

Last week I was out running errands, and I made a stop at Michael's craft store. I always like to see what kind of cupcake wrappers they have, even if I don't need them. I'm glad I did because not only did I find some for every day use, but I also found some Toy Story 3 cupcake wrappers with an alien on the bottom. OooOOOo. I'm going to be honest, it was the alien that sold it for me, and it inspired these cupcakes that I will show you how to make today.


The wrappers come in a pack of 75 for $1.99! Each wrapper has the Toy Story green alien on the bottom (saying OoOOoo), with Woody, Buzz Lightyear, Rex, and Ham around the sides.

So now that you have the wrappers (or are about the get them), lets make Green Alien cupcakes!

Just like with the Woody Sheriff badge cookies, we are going to make these from scratch. Here is what you will need:


• 1 c. unsalted butter
• 2 c. sugar
• 4 eggs
• 1 1/2 c. self rising flour
• 1 1/4 all purpose flour
• 1 c. milk
• 1 tsp vanilla
• green or neon green (or both) food coloring

Preheat oven to 350°.
In a mixing bowl, mix butter until smooth. Next add sugar, eggs, milk, and vanilla. Then add your flour 1/2 c. at a time. Once everything is blended, add your food coloring. I used both green and neon green food coloring to give the cupcake the perfect alien shade of green. If you only have one or the other, that will work too.
Now pour your batter into the cupcake papers. If you have an ice cream scooper, this not only helps with making sure each cupcake has the same amount of batter, but also helps with keeping the mess down.
Bake time is 20-25 mins depending on your oven. Put a tooth pick in a cupcake after 20 mins, and if it comes out clean it's done baking. If not keep checking every couple minutes.


Once they are done, wait 10 mins to cool. Then remove from pan, and place on wire rack to cool completely for frosting.

What you will need for frosting and decorating:


• 1 c. unsalted butter
• 8 c. of confectioners sugar (or more depending on thickness)
• 1/2 c. milk
• 2 tsp vanilla
• green or neon green food coloring (whatever you used for the cupake, use that again)
• white M&Ms
• black and green decorating gel

Again blend your butter until smooth, add milk, vanilla, and confectioners sugar 1/2 c. at a time. You will know that your frosting is done if you take a spoon, lift frosting out, and it stays in place on spoon. If it starts dripping you need more confectioners sugar. Add food coloring last. Make sure it's completely blended, so you don't have small chunks where the dye missed.

Now is the fun part. Take your completely cooled cupcake, and drop a heap of frosting in the middle. With a smooth knife or spatula, spread the frosting around to make a smooth surface.


Now take your white M&Ms, and place them across with the middle one being slightly higher.
If you have a hard time finding white M&Ms, Party City has them in the wedding section of the store.


Next take your green decorating gel (I used Wiltons Sparkle Gel also found at Party City), and outline the top of the M&M to create an eye lid for the green alien.


Take your black decorating gel, and make little dots in the middle of the M&M to complete the eye.


And last draw a line across for the mouth, and then draw the "O" into the line.


You should now have a Green Alien.


As you can see these are kid tested and approved, but you don't have to be a kid to enjoy them!

And if you don't feel like making the aliens, but you still want to make Toy Story cupcakes, I found these cupcake toppers at Party City.


And they also carry the cupcake wrapper for $1.99, so you could make it a one-stop shopping trip, and avoid Michael's craft store all together.

Woody Sheriff Badge Cookies

Tuesday, June 15, 2010


One thing I really enjoy is baking. I'm always coming up with new cupcakes and cookies to make, and I'm always on the lookout for yummy treats too.
Today I want to share with you an extra simple Toy Story-themed sugar cookie to make at home, Woody Sheriff badge cookies!
There are lots of ways to be elaborate with decorating, but sometimes simple is best.

You'll be making these from scratch, so here are the ingredients you will need:

• 2 1/2 cups of flour
• 1/4 teaspoon salt
• 1 cup (2 sticks) butter, softened
• 1 cup sugar
• 1 large egg
• 1/4 teaspoon almond extract
• 1 teaspoon vanilla extract

Beat butter and sugar in mixing bowl until light and fluffy. Next add egg, vanilla, and almond extract, and blend together.
Next add salt, and 1/2 cup of flour at a time until well mixed.
Now take your dough and mold into a log shape, wrap in saran wrap, and refrigerate for a few hours or overnight.


To make these Woody Sheriff badge cookies you will need:

• greased cookie sheet(s)
• 1 large star cookie cutter
• small letter rubber stamps
• flour
• rolling pin
• 1 thin paint brush
• 1 small bowl of water
• yellow sprinkles for decorating

Preheat the oven to 350°F.

Divide your dough into quarters, and on a cutting board spread some flour to prevent sticking.
You are going to roll out your dough to about 1/8 inch thick.

Take your cookie cutter, and cut out as many stars with each piece of rolled-out dough.
Now take your paintbrush, dip into water, and "paint" the water along the edges of each cookie. Next sprinkle with yellow sprinkles, and shake off excess if you desire.

Now place your cookie on your greased cookie sheet and get out those rubber stamps.
You are going to stamp SHERIFF into each cookie, and voilĂ  you are done.

Bake for about 8-9 mins. If the edges turn brown, they are done. I like to take them out before they turn brown, to make them a little softer.


You can make these really simple without the sprinkles, or you can just cover the whole star in sprinkles. That's the best part about baking your own cookies, you get to be creative and have fun!